
Attacking the Switch
As much of the basketball world settles into the off-season, a top priority on most coaches “to do lists”, is to learn new and effective ways of attacking a switching defense. With defenses continuing to get more tactically sound at switching 1 through 5, the need for the offense to develop solutions to combat these switches is at an all-time premium.
There are a variety of philosophies/strategies when it comes to attacking a switching defense, but two of the main schools of thought from the offensive side are to either:
1) Not worry about attacking mismatches and just “let the switch come out in the wash”. In other words, just keeping running your offense and don’t stop your offense to try and take advantage of a mismatch from all the switching.
- In this situation the offense might run more “slips” and “rim cuts” within their offense and focus on their overall offensive movement creating an advantage against the switch. This philosophy can be more advantageous for younger or less experienced teams because, for coaches, it can be difficult to teach players to 1) Recognize the mismatch in real-time, 2) Know how to take advantage of the switch and 3) Have the required skill/talent to actually punish the switch on a regular basis.
Or, the offense might…
2) Try and actively seek out the mismatch and create an advantage from it.
- In this situation the offense will hold up the flow of their offense to try and play out of the mismatch, whether that be from a Guard attacking a Big off the dribble, a Big posting a Guard at the block or elbow, or just getting a desired matchup somewhere on the floor, even if it is “like sizes.”
- What defenses have gotten particularly better at when it comes to switching (especially later in the shot clock), is finding ways to 1) Minimize the mismatch of a Defensive Big guarding a playmaker on the Perimeter, and 2) Hide the mismatch of a Defensive Guard trying to battle an Offensive Big in the Post.
Below we’ll look into a few effective ways that teams are attacking a switch with a combination of the two philosophies above, where they’re both recognizing and punishing a switch, but not by completely halting their offense to do so. What the below actions are doing against the mismatch is finding other ways to create a closeout situation after the switch in which to play from.
If a series of GIFs showing players attacking a closeout gets your juices flowing, this newsletter’s for you.
Defensive Switching – Minimizing Mismatches
Before getting to the offensive side of the ball, here are some examples of the great defensive tactics teams are using to hide or minimize a mismatch after a switch, especially in a late clock situation…
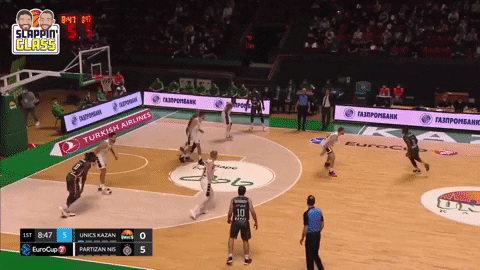
#1 Defense Sends a Late Double Team
After the offensive finds a mismatch they’re trying to take advantage of, like a Guard attacking a Defensive Big after a PNR, the defense will send a late double as the Guard starts to operate, leaving little time for another player to make a play…
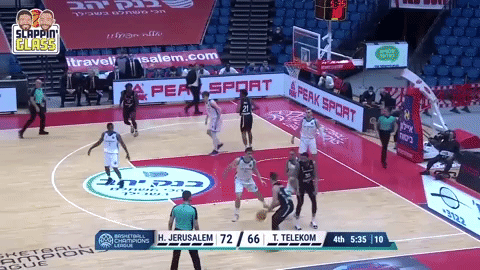
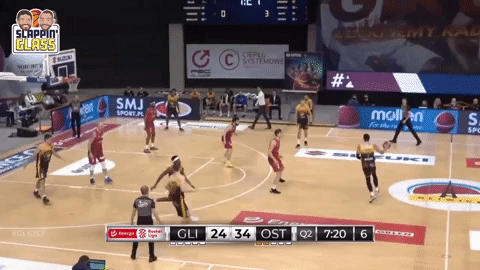
#2 Defense Shrinks to a Zone
Not quite as aggressive as sending a Double, but as the Offense starts to operate against the mismatch, the Defense can sink into a “2-3 Zone” look to force the guard into attacking a crowded key. This tactic is also useful in covering up a mismatch in the post where a Big is trying to post a Guard…

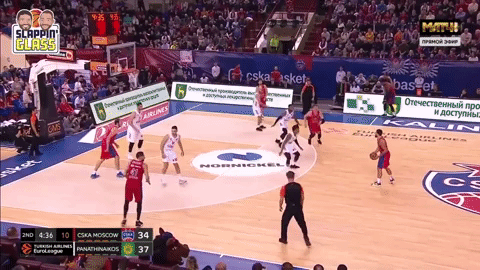
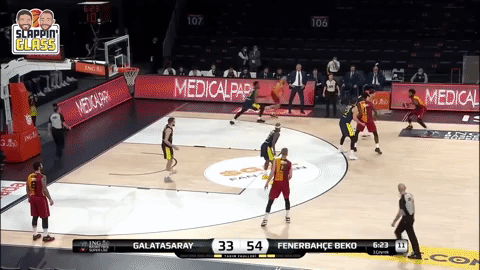
#3 Defense Denies the Boomerang Pass
Defenses have also made it more difficult to attack a switch by aggressively denying the “Boomerang” pass back to the Guard. This action can force another, less-preferred, ballhandler into making a play late in the Shot-Clock…

Zooming In: The overriding theme of the three tactics above is that defenses have figured out ways to be less passive in letting an offense take advantage of a perceived mismatch after a switch. By picking spots to double, deny, or shrink into the key, defenses are forcing the offense to find alternate routes to attack the switch.
Attacking a Switch – Offensive Actions
The main theme of the below actions, when thinking about attacking a switch, is that the offense is using the other three offensive players to create a closeout/advantage, rather than trying to seek out an ISO situation on the perimeter or block. Attacking a mismatch is still a part of these actions, but it is more about the Offensive Guard giving the ball up and creating a play for someone else.
The three actions are Skips/Throw Aheads, Flares, and False Motion.
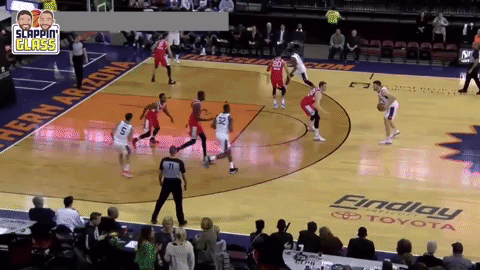
#1 Skips & Throw Aheads
After the Offense gets a desired switch for a Post Player, instead of being solely focused on force-feeding the ball into the block, they can take advantage of a “low help” defender shading closer toward the Post mismatch (as former podcast guest, Sam Dekker, is doing below), and Skip the ball to the weakside to attack through a closeout…
Zooming In: This is, admittedly, a difficult and high-level pass, but sometimes just teaching a guard to look across the court without actually throwing this pass is enough to freeze the helpside defender and allow the Guard to enter it into the Post to take advantage of the mismatch that way. A couple weeks ago, Frantz Massenat, a professional guard playing in Italy’s Top League, talked about freezing helpside defenders with his eyes in our podcast with him a couple weeks ago.
In a similar vein to the Skip pass, the “Throw Ahead” pass can be equally as effective as the Skip in creating a closeout. The Throw Ahead is a little easier to execute as it’s often on the same side of the floor or just one pass ahead.
Here’s the Throw Ahead right as the guard starts to attack the Switch…
And here’s the Throw Ahead right before the Guard starts to attack the Switch…
Zooming In: Both Throw Ahead situations take advantage of a defense shrinking and sinking toward the Blocks and Elbows to give help on the potential 1 v. 1 mismatch the offense has. Both situations highlight the quick decision making of the offensive players receiving the Throw Ahead and their understanding of how to attack the closeout created out of the mismatch.
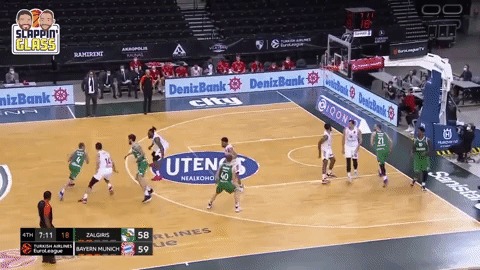
#2 Flares
The above Throw Ahead actions take advantage of a defense shrinking toward the Elbows to give help on a mismatch. In those instances, the offense is simply spaced and ready to catch and attack downhill. Another approach to attack the “switch and shrink” defense, is for the offense to set Flare Screens as the Guard starts to operate against the mismatch…
Zooming In: Flares are difficult enough to guard in general, but they can be especially effective in a late-clock, mismatch isolation situation because the defense is generally concerned about shrinking to give help on the playmaking guard. If the offensive guard is a willing passer, a flare makes it really hard for the defenders to both give help on the drive and guard the shooter coming off the flare.
#3 False Motion to Stampede Action
Referring back to the first section of this newsletter, defenses have gotten craftier at denying the “boomerang pass” back to a guard after a switch. For reference, here it is again…
So… another way to achieve the same “boomerang” effect, is to run some false motion on the other side of the floor before throwing the ball back to the mismatch. Here’s an example from Cody Toppert’s playbook when he was in the G-League…
Zooming In: This action works well because the false motion before the “Stampede” action (catching on the move) makes it difficult for the defender to deny the pass back since they have to jump into help. The motion also allows the offensive player who’s going to attack to get properly space as he/she prepares to catch on the move.
For a complete breakdown of all of these actions and more, here’s today’s newest deep-dive video on Attacking the Switch…
