Hard Hedging, Switching, Icing, Trapping, Pin and Under… there are all sorts of ways to try and disrupt the advantages caused by a PNR.
Today we’ll take a look at another PNR Coverage being utilized more frequently in Europe, the “Hedge and Under.”
What is it? Simply defined, the “Hedge and Under” is an action where:
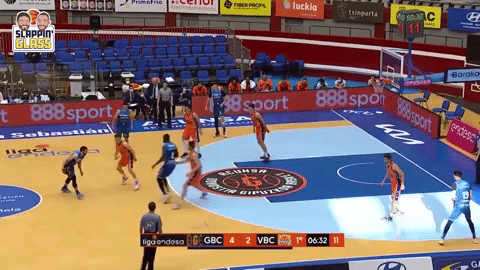
- The Defensive Big will “Hard Hedge” on the ballhandler, while the On-Ball Defender will go UNDER the rolling offensive big.
It looks like this…

In exploring the Hedge and Under we’ll cover:
- Why to Hedge in the first place?
- Why to use the “Under”?
- The potential pitfalls of the scheme
1. Why Hedge?
Before getting to the “Under” part of this scheme, it’s worth revisiting why the “Hedge” can be so effective. In general, the Hedge can be used to:
- Keep a dynamic ballhandler from getting downhill on the PNR
- While “Ice/Drop” coverages are good at keeping the PNR a 2 v. 2 game, they do allow the ballhandler to more easily get into the paint to make plays as a scorer or passer. A Hedge can make it harder to get a paint touch for most ballhandlers not named Harden or Curry.
- For defenses focused on keeping the ball on one side of the floor, Hedging can also be effective at “turning the ball back” and allowing the backside help defenders to move into more predictable off-ball rotations. This is especially true in a PNR on the outer thirds of the floor.
- Force the ballhandler to be a passer rather than a scorer
- The Hedge can force an unwilling passer to give the ball up and stress tests the offense to see if they can make multiple passes to create an advantage.
- Allow the on-ball defender to stay matched up with the ballhandler
- This is used quite a bit in the NBA when trying to maintain a specific defensive matchup (not switching) in late clock situations.
- Limit the effectiveness of a great “Rim Roller”
- The Hedge often pushes the ballhandler out to an area where a lob or pass to the Rim Roller is difficult.
- Dictating Style of Play/Tempo
- Sometimes Hedging is beneficial when attempting to dictate style of play or tempo, especially early in a game or after a timeout. Even though Hedging is riskier than other PNR coverages because it often forces the defense into rotation, when it comes to trying to establish a mental edge as the “aggressor” and throw a guard, team, or coach out of rhythm, it can be highly useful.
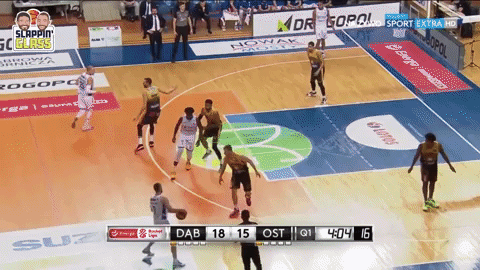
Here are a couple examples to illustrate the above points:
Hedge to Force the Skip
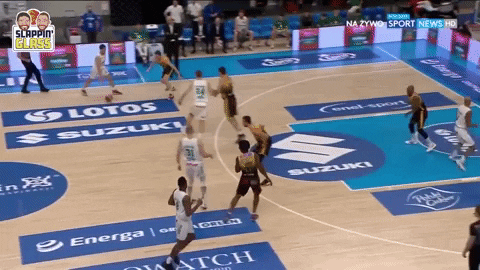
And… Hedge to Force Multiple Passes
Now for the “Under” part of all this. In most Hedging situations, like shown in the two GIFs above, the on-ball defender is fighting “Over” the screen to get back to the ballhandler. This can obviously work well in many situations and is especially great at keeping constant contact and pressure on the ballhander.
But, the “Hedge and Over” does leave an opening for one of the most dangerous actions in the game… the Short Roll. If a team is able to “get-off-the-ball” quickly at the point of the Hedge and before the backside defenders can rotate into coverage, the Hard Hedge’s kryptonite is the offense hitting their big on the Short Roll.
The Short Roll causes all sorts of problems as it allows the offense to:
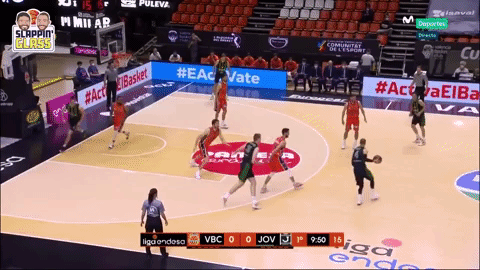
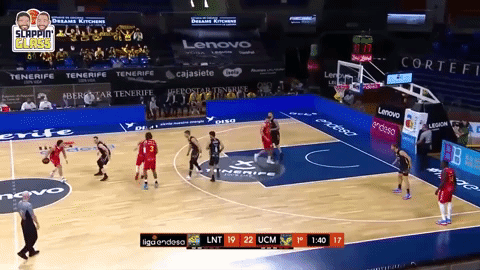
- Spray Passes to Shooters…Short Roll and Spray2. Find Baseline Cutters…Baseline Cut3. Attack and Score…Buddy Buckets4. Simultaneously Upset Head Coaches and Assistants…Short Roll Problems2. Enter the “Under”When a defense wants to enjoy some of the benefits of Hedging (like mentioned above), but also wants to have better coverage on the Short Roll, going Under the Offensive Big during the PNR can be effective. Here’s another look at that action…Hedge and Under
* Zooming In: In the Hedge and Under the on-ball defender has a tough job as they need to 1) make sure they actually get Under the screener so that they can effectively dissuade a pass to the Short Roll, and 2) recover back to the ballhandler as the big is sprinting to the cover the Roller.
The other important element of this coverage is the movement by the other three defenders. More times than not, the “Hedge and Under” will require at least a stunt from the low “Tag Defender” during the split seconds that the Defensive Big is recovering to the roller. Here’s an example of a full rotation from the “Tag” during the Hedge and Under…
What about the Slip/Ghost?
It wouldn’t be a Sunday Mornin’ Newsletter in 2021 without at least one mention of a Ghost Screen. With how often teams will Ghost or Slip Out of a PNR, if a defense is still trying to utilize the Hedge and Under and the on-ball defender can’t get under the screen, then they can still pull off the coverage by zoning the Short Roll area before recovering back to the ballhandler…
Weaknesses and Pitfalls
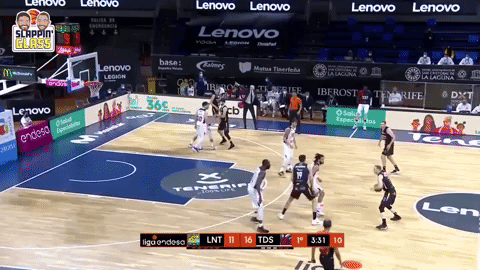
Nothing is perfect, and there are a few areas of concern when running this coverage. The first is giving up an off-the-dribble three point attempt by the ballhandler as the guard recovers back…
*Zooming In: Two notes on this… 1) this is not a coverage teams will likely run against an elite shooter for the obvious reason that it can lead to an open, in-rhythm three, and 2) depending on time/score and all that “it depends” stuff, this is still a shot coaches are potentially comfortable with as a contested, “off-the-dribble” three is still a more difficult shot and lower down on the “Great Shot Totem Pole.”
Another weakness of the Hedge and Under coverage arises if the Offensive Big setting the on-ball has the ability to Pick and Pop…
*Zooming In: With an offensive Big that can slip out of the PNR and shoot the three, the Hedge and Under makes the pass back to the Big much easier. This scheme opens a direct passing lane and there’s very little pressure on the ballhandler as he/she makes the pass.
We’ve broken down many more examples in our full video on the Hedge and Under. You can view them all here…